Fedeli_sig_redwht-400x
brush-white-thinwide

CURRENT PROJECT

Autumn Barn
28″x22″
Oil on Canvas

OTE_Title-nekkid
2021-HandPaint

PROJECT NOTES:

AutumnBarn 7 680x500 1

This is a commissioned piece for a collector in San Diego.

brushwhite-thinH

••• Canvas Preparation •••

brush-white-wideH

02/03/2016

Step 1
The prep for this painting is a bit different than what I typically do. After I sketched in the basics using charcoal pencils, and then sealed it with clear Gesso.

The clear Gesso prevents the charcoal from smearing or getting in the paint, while still being able to see the sketch.

painting tip
Brush Tips:
The clear gesso also provides a really nice tooth to grab the paint. By sanding between coats you can leave as much, or as little texture as you want from your brush. It works well to smooth out heavily textured canvas if you want to do fine detail work on it. Just sand between coats until you get the feel you desire.

brushwhite-thinH

••• Painting with Oils •••

brush-white-wideH

02/15/2016

Day One of Oils
Today I started the oil painting. The really cool thing about the clear Gesso is that it adds significant tooth to the canvas, and I really like the way it pulls the paint from the brush. It’s an entirely different feel.

I started this piece by working from the background forward. The green/black came first, and then I began blending in some of the deeper greens that will be used for the trees. I will continue to work forward, adding in the rest of the greens and then the oranges used in the foreground trees. This is a fun one (so far).

01/15/2019

Session 2
I continued to work on the trees in the background today, adding various green hues, and then started on the miscellaneous leaves in lighter shades of green.

Since most of the background will be covered by the trees in the foreground it wasn’t necessary to add a lot of detail to these trees.  I did spend more time on details in the few open areas that will remain visible.

I then began to work on adding some of the tree trunks and branches. Once these are in, it will define where more leaves should be in relation to the branches. Some of these leaves will be in front of the trunks and branches and will begin to add some depth to the piece. I will continue to work from dark to light, background to foreground.

01/15/2019

Session 3
I did some more detail work on the trees to the right side of the barn, and experimented a little bit with color on the foreground tree. I still have more work to do to get that color right.

I am mixing with Raw Umber as the base color here.

01/15/2019

Session 4
Believe it or not, I have been working on this one – I just haven’t been good about posting the work online.

It has been a bit tedious with all the leaves, and more leaves, and the branches… with leaves. After being away from the easel for an extended period, it has taken a bit of trial and error to really establish a rhythm and technique again, but this photo shows where I am at right now.

The green leaves in the background are now fully detailed, along with most of the branches. I’ve cut some windows in the back of the barn for a nice view to the outside. All of the autumn leaves are blocked in, and I have gone back  into most of the foreground areas and painted the leaves in greater detail.

There is still quite a lot more work to do with the leaves, but if I don’t vary what I am doing I’ll lose my mind! So, I started blocking in the foreground colors for the grasses, using various shades of greens, yellows, etc.

01/15/2019

Session 5
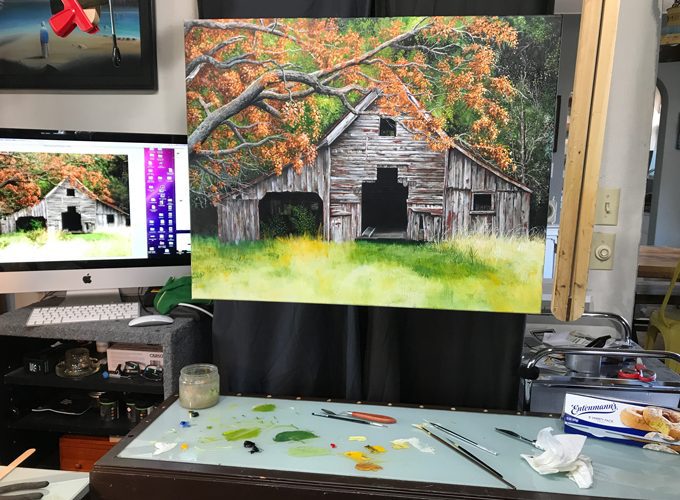
I have added the dark areas in the orange leaves and it’s really starting to come together now. Having completed the majority of the finer details on the barn, I am now able to start painting the grasses in the foreground.

I start by simply painting some finer vertical lines for the grasses in the areas I blocked out earlier. As they begin to overlap each other the blocks of color will blend together to look natural.

painting tip
Brush Tips: 
Using a fan brush can help define individual blades of grass – but if used carelessly, it can also draw parallel lines of the same width and length which looks fake. Use care in your strokes and you can avoid this. Do the larger, more visible foreground grasses individually with a finer liner brush to vary what the eyes perceive and to add interest.

06/27/2017

06/27/2017

06/27/2017

06/27/2017

Session 6
Working from back to front, I am building up the blades of grass, making them slightly thicker and longer as they get closer to the viewer.


 Working wet-in-wet, I can block in the smaller areas as I go, and paint right over the top with different colors to randomly mix the different grasses together for a more natural look.


Here are a couple detailed images of the grasses.

08/18/2017

Session 7
I am very close to completing this piece now. Just a few more hours tidying things up and catching some final details. I hope you’ve enjoyed this one – it was a long time coming.


The final piece has been added to the Gallery section. Let me know what you think!

See you again soon…

David signature 250x118 1

© Copyright 1996-2024 – David Fedeli Fine Art • All rights reserved

© 1996-2024 – David Fedeli Fine Art • All rights reserved

David Fedeli
FINE ART STUDIO